|
|
Post by Valkman on Sept 5, 2012 14:21:13 GMT -4
Recently I decided to convert my tried and tested Chaos 600 into an AP ship. After doing a lot of research I thought I could make one myself using the abundance of spare heli parts that I have lying around. Most of the donated parts came from old Century Halks. I decided to go with 2 axis for the time being and later I can convert to 3 if needed. I coverted the servos for 360 rotation and left the pots out so later I can use gyro stabilization if needed. At the moment I am more interested in pictures so I don't need that for the moment. I never took pictures of most of the build but I did get messages from people who was interested so I am doing a write up of my progress. There is still a bit to do as I am now going to stretch it to a 700 and convert to 12s and I have to make landing skids, battery tray and longer boom supports among other things. When I am finished I will be taking the whole thing apart and tidying up edges etc on the gimbal. NOTE: take care when cutting CF. It gives off a dust so wear a mask or do it outside and wear gloves. CF cuts very easily with a jigsaw using a hacksaw blade and a file. A video of what I have done so far can be seen here. Attachments:
|
|
|
|
Post by Valkman on Sept 5, 2012 14:23:14 GMT -4
The gimbal I had an idea of the shape so I drew out plans on paper which is also near enough the size of the carbon fiber sheets I was buying. This will also let me know how much CF I needed. When I got the sheets I covered them in masking tape and drew the plan onto that before cutting.I had not bought the camera at that stage but I had the measurements for it. It turned out I only needed 3 sheets of 2mm 8"*12 which cost about $60 delivered. This is plenty strong enough and I had bits left over to make odd ends. I bought the CF from myworld.ebay.com/performance_group_composites/?_trksid=p4340.l2559I cut out the bearing holders from a Halk frame and used them for the main axle. I used a main shaft cut down and tapped on the top for the axle as it is hollow and lighter. To stop the gimbal falled off I used two mast stoppers. For the pivot point on the camera I used the starter shaft (?)from the Halk which is 6mm. This also gave me the bearing holders which I used on the axis. You could also use a tail shaft for this. The gears are the main gear and the motor pinion from the Halk. I had to drill the pinion a bit bigger to fit the servo. Using these gears I got about 6 to 1 ratio from the servo which seems to be what most are using. After the gimbal was assembled it is VERY solid. I may end of cutting a bit here and there just to save weight and the looks. Attachments:
|
|
|
|
Post by Valkman on Sept 5, 2012 14:28:02 GMT -4
The camera platform showing the brackets cut from a frame. The base is a solid piece at the moment and I may end up cutting it up a bit. Attachments:
|
|
|
|
Post by Valkman on Sept 5, 2012 14:28:59 GMT -4
The shutter servo with the mount bracket which is the same bracket used under the camer platfrom. Attachments:
|
|
|
|
Post by Valkman on Sept 5, 2012 14:29:52 GMT -4
The Rx fitted nicely between the frame with double sided tape. Attachments:
|
|
|
|
Post by Valkman on Sept 5, 2012 14:38:36 GMT -4
The Booms The boom support is two 30 size tail booms cut down. The two shocks I got for about $5 from Ebay. I ended up using stronger springs on the shock because when the camera and gear was mounted the weak shocks compressed more than I liked. I then made small CF brackets to mount to the heli frame that the shock will mount to. The shocks are then connected to the booms using tail boom supports. I bought the rubber mounts (Lord Mounts)on the rear for about $13 delivered from aircraftspruce.com . 2* 10-02183 instrument shock mount price 6.86 ea. They forgot to charge me for the postage but say nothing! They did want $40 to ship but I go onto them and they were to charge me $10 as I said it will fit into an envelope. I hate people trying to rip me off but at least the sorted it. The Lord Mounts were mounted to the booms by cutting up a CF bracket then tightly inserted into the boom. Again I used a piece of paper with measurements to draw a plan. Then I used 3 aluminium frame spacers from a Halk to mount the Lord mounts. These spacers were cut to length and tapped for a screw. To finish it off I used grommets in the open end of the booms to seal them. Attachments:
|
|
|
|
Post by Valkman on Sept 5, 2012 14:40:35 GMT -4
The plans. Attachments:
|
|
|
|
Post by Valkman on Sept 5, 2012 14:41:45 GMT -4
The landing skids. For the skids I cut up a set of skids and added in lengths of CF to make them taller. I then reinforced the skids with a braket made from a Shogun tail boom.This had to be bent as I did not like the idea of it close to the ground. Then I made the skids longer by cutting them in half and adding a tube from another Shogun tail boom. This was a very tight fit. When all was finished I placed it on a table to make sure it sat level and applied force ( a lot!) to it to make sure it will hold up. I will be adding pipe insulation that most use on the skids Attachments:
|
|
|
|
Post by Valkman on Sept 5, 2012 14:42:19 GMT -4
The skid supports. Attachments:
|
|
|
|
Post by Valkman on Sept 5, 2012 14:44:56 GMT -4
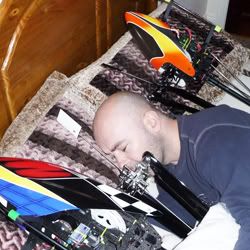
You can see the way the skids turned out in the picture at the start of this topic. Attachments:
|
|
|
|
Post by Valkman on Sept 17, 2012 17:07:10 GMT -4
Today I stretched the heli to a 700. Parts used.... HN7056: Torque tube HN7047T: 700 boom In order to use the 700 boom you have to cut off 40mm from the end of the boom. The TT comes with 2 new bearings so I used these along with another one I had. So I have 3 bearings on the TT. I oiled the bearings and took the tail gearbox apart and oiled them bearings also. The longer main blades use a 5mm bolt so I had to drill the blade grips for the larger bolts. I scratched my head for a while before doing this as I was thinking of using bushings on the smaller blade bolts so I would not need to drill the grips but in the end I went the safer route and used the larger bolts to go with the heavier blades. Attachments:
|
|
|
|
Post by Valkman on Sept 17, 2012 17:09:22 GMT -4
I was suprised to see the ALign 700 TT had no pins in the ends of it like the Chaos one. The ALign 600 must be the same. I may drill and insert them before flight. OK it " may " not need it but better to be safe than sorry. Attachments:
|
|
|
|
Post by Valkman on Sept 17, 2012 17:11:01 GMT -4
Boom cut and ready for TT. All metal swarf was removed of course before it was installed. Attachments:
|
|
|
|
Post by Dr. Evil on Sept 17, 2012 18:28:08 GMT -4
Looking good Joe!
|
|
|
|
Post by Valkman on Sept 17, 2012 19:13:23 GMT -4
Bit by bit man. Bit by bit. It's taking a lot of research, time and money!
|
|


 ? seems like a decent deal for 749. !!!!!